简介
本篇文章解析了vue-virtual-collection组件是如何巧妙运用了“块渲染”的思想去渲染需要的数据。
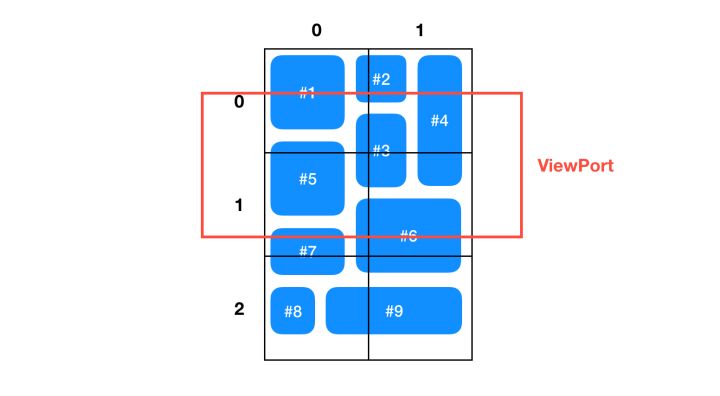
可以参考下图:

该图片完美的解析了“块渲染的思想” , 让我们来分析一下上图。
为了高效计算视图中显示那些块,我们可以先定义一个 div 为 X * X , 所有与这个div有重叠的Cell(块)都会在这个块记录下来,然后把这个Cell(块)保存到一个Map(相当与一个字典)中,那么当滚动发生时我们就可以从这个Map(相当与一个字典)中找到当前需要渲染出来的块,就不用再去遍历所有的Cell(块)再去进行渲染了。
试想下比如我们需要在一本字典中找一个我们想要找的单词 , 我们首先想到的是会有两种方法去找。
1.我们去一页一页的去翻去查找。
2.我们通过字典的索引去查找。
上面两种方法我会毫不犹豫的选第二种,而”把这个Cell(块)保存到一个Map中再去查找”道理是一样的。
此时,Map中记录的应该是:
{
  "0.0": [1, 2, 3, 5], // 0.0块与1,2,3,5号Cell有重叠,下同
  "0.1": [5, 3, 6, 7],
  "0.2": [7, 6, 8, 9],
  "1.0": [2, 3, 4],
  "1.1": [3, 4, 6],
  "1.2": [6, 9]
}
当我们滚动了页面,根据滚动的距离、viewPort 的宽高,可以很容易计算出当前需要渲染哪些块。
源码解析
第一步我们先去创建一个div为包裹层
App.vue
<template>
  <div class="vue-wrapper" :style="wrapperStyle">

  </div>
</template>

<script>
  export default {
    data () {
      return {
        height: 500,
        width: 500
      }
    },
    computed: {
      // 创建这个层的宽高
      wrapperStyle () {
        return {
          height: `${this.height}px`,
          width: `${this.height}px`
        }
      }
    }
  }
</script>
<style>
  .vue-wrapper {
    overflow: scroll;
    -webkit-overflow-scrolling: touch;
  }
</style>
因为要设置我们需要显示那些数据,所以我们需要为每一个块都设置一些信息,表示当前块包含哪些或者说与哪些块是重叠在一起的,于是我们创建一个Section(类)
Section.js
/**
   *窗口的显示部分 -> 当前viewPort显示的部分。
   *把cell(块)组合起来显示在当前的窗口。
   *这使我们能够更快地确定在窗口的给定区域显示哪些单元格。
   *显示具有固定的大小,并包含0到多个块(由其索引跟踪)。
 */

export default class Section {
  constructor ({width, height, x, y}) {
    this.width = width;
    this.height = height;
    this.x = x;
    this.y = y;

    // 收集当前应该显示那些块
    this._indexMap = {};

    // 收集当前需要显示块的索引
    this._indices = [];
  }

  // 有添加就有获取

  // 添加块的索引
  addCellIndex ({index}) {
    if (!this._indexMap[index]) {
      // 收集当前应该显示那些块
      this._indexMap[index] = true;
      // 收集当前需要显示块的索引并保持它们
     return this._indices.push(index);
    }
  }

  // 获取所有块的索引
  getCellIndex () {
    return this._indices;
  }
}
通过上面的类我们已经为每一个块都设置了一些信息,然后我们再创建一个SectionManager(类)用于管理和设置这些块,里面包含了创建块的索引,获取块,获取块索引的方法
// 用于创建每一个块所包含的信息
import Section from "./Section";

// 默认视图大小 600
const SECTION_SIZE = 600;

export default class SectionManager {
  constructor (sectionSize = SECTION_SIZE) {
    // 设置默认视图大小
    this._sectionSize = sectionSize;

    // 收集所有块的数据
    this._cellMetadata = []

    // 用于收集一个块所包含的信息
    this._sections = {};
  }
}
然后在该SectionManager(类)中定义一个方法用于创建一个块的一些信息
 // 创建一个块里面所应该包含的信息
  registerCell ({cellMetadatum, index}) {
    // 收集所有块的数据
    this._cellMetadata[index] = cellMetadatum;

    // 该方法会返回所有的块的信息
        this.getSections(cellMetadatum).forEach((section) => {
          return section.addCellIndex({index});
        });
  }

  // 该方法会返回所有的块的信息
    getSections ({height, width, x, y}) {
      /*
       =>┏━━┯━━┯━━┓ 分割线sectionY
       0┃0 0 ┊1 3 ┊6 6 ┃
       1┃0 0 ┊2 3 ┊6 6 ┃
       =>┠┈┈┼┈┈┼┈┈┨ 分割线 sectionY
       2┃4 4 ┊4 3 ┊7 8 ┃
       3┃4 4 ┊4 5 ┊9 9 ┃
       ┗━━┷━━┷━━┛
       ↑    ↑
       sectionX sectionX
       */

      // 设置该块X轴的分割线
      const sectionXStart = Math.floor(x / this._sectionSize);
      const sectionXStop = Math.floor((x + width - 1) / this._sectionSize);

      // 设置该块Y轴的分割线
      const sectionYStart = Math.floor(y / this._sectionSize);
      const sectionYStop = Math.floor((y + height - 1) / this._sectionSize);

      // 设置用于保存所有重叠的块
      const sections = [];

      // 创建块的范围
      for (let sectionX = sectionXStart; sectionX <= sectionXStop; sectionX++) {
        for (let sectionY = sectionYStart; sectionY <= sectionYStop; sectionY++) {
          // 为每一块都创建一个key用于查找
          const key = `${sectionX}.${sectionY}`;
          if (!this._sections[key]) {
            this._sections[key] = new Section({
              height: this._sectionSize,
              width: this._sectionSize,
              x: sectionX * this._sectionSize,
              y: sectionY * this._sectionSize
            });
          }

          // 把每个块所包含的信息都保存起来
          sections.push(this._sections[key])
        }
      }

      // 返回所有的块的信息
      return sections
    }
然后我们需要去调用这个类(SectionManager)的创建块的方法去创建所有块的所应该包含信息
App.vue
<script>
 created () {
  // 获取块的管理
  this._sectionManager = new SectionManager(this.sectionSize);

  // 注册块和块的管理
  this.registerCellsToSectionManager();
},
methods: {
  // 注册块和块的管理
  registerCellsToSectionManager () {
    // 如果_sectionManager中没有数据就创建一个
    if (!this._sectionManager) {
      this._sectionManager = new SectionManager(this.sectionSize);
    }

    // 我们需要去遍历去注册它,为每一个块都设置一个对应的信息方便用于查找他
    this.collection.forEach((item, index) => {
      // 注册块 -> 为每一个块都设置一个对应的信息
      this._sectionManager.registerCell({
        index,
        cellMetadatum: this.cellSizeAndPositionGetter(item, index)
      });
    });
  },
  // 我们需要一个方法去计算这些块的信息 -> 用于计算每一个块显示的大小和显示的位置
  cellSizeAndPositionGetter (item, index) {
    // 计算大小和位置
    return {
      width: 100,
      height: 150,
      x: (index % 2 * 110),
      y: parseInt(index / 2) * 160
    }
  }
}
watch: {
   // 监听数据的变化重新重新注册块进行渲染
  collection() {
    this.registerCellsToSectionManager()
  }
 }
</script>
上面中我们已经创建了所有块的所应该包含的信息了,接下来我们应该去创建所有块的总高度 = 创建滚动区域
App.vue
<template>
  <div class="vue-wrapper" :style="wrapperStyle">
    <div class="vue-wrapper-container" :style="scrollHeight">
      <div class="cell-container" v-for="(item, index) in displayItems">

      </div>
    </div>
  </div>
</template>

<script>
computed: {
  // 创建滚动区域
  scrollHeight () {
    let scrollHeight = 0;
    let scrollWidth = 0;

    // 遍历循环计算出滚动区域的总宽度和总高度
    this._sectionManager._cellMetadata.forEach((sizeAndPosition) => {
      const {x, y, width, height} = sizeAndPosition;
      const bottom = y - height;
      const right = x - width;

      if (bottom > scrollHeight) {
        scrollHeight = bottom
      }
      if (right > scrollWidth) {
        scrollWidth = right
      }
    });

    return {
      height: scrollHeight + 'px',
      width: scrollWidth + 'px'
    }
  }
}
</script>
有了滚动区域后我们应该去创建当前视图中所应该渲染的块是那些
App.vue
<template>
  <div class="vue-wrapper" :style="wrapperStyle" ref="VueWrapper">
    <div class="vue-wrapper-container" :style="scrollHeight">
      <div class="cell-container" v-for="(item, index) in displayItems" :style="getComputedStyle(item, index)">

      </div>
    </div>
  </div>
</template>
<script>
 // 设置当前视图我们中应该显示那些块
  flushDisplayItems () {
    let scrollTop = 0;
    let scrollLeft = 0;

    // 设置可以滚动的高度和宽度
    if (this.$refs.VueWrapper) {
      scrollTop = this.$refs.VueWrapper.scrollTop;
      scrollLeft = this.$refs.VueWrapper.scrollLeft;
    }

    // 然后这里我们需要去设置当前视图中应该渲染那些块
    // 于是我们要在 SectionManager类中定义一个方法去获取需要渲染的那个块的索引
    let index = this._sectionManager.getCellIndex({
      height: this.height,
      width: this.width,
      x: scrollLeft,
      y: scrollTop
    });
    // 到这里我们已经获取到了索引了,然后我们就可以去渲染该视图所对应的块了
    const displayItems = [];
    index.forEach((index) => {
      displayItems.push({
        index,
        ...this.collection[index]
      });
    });

    if (window.requestAnimationFrame) {
      window.requestAnimationFrame(() => {
        this.displayItems = displayItems;

        // 强制更新当前组件(以及 Slot 里面的組件,但不包含全部子組件 )
        this.$forceUpdate();
      })
    } else {
      this.displayItems = displayItems;

      // 强制更新当前组件(以及 Slot 里面的組件,但不包含全部子組件 )
      this.$forceUpdate();
    }
  },
  // 获取到视图应该渲染那些块之外我们还需要设置这些块所应该在的位置
  getComputedStyle(displayItem) {
    if (!displayItem) {
      return;
    }

    const { width, height, x, y } = this._sectionManager._cellMetadata[displayItem.index];

    return {
      left: `${x}px`,
      top: `${y}px`,
      width: `${width}px`,
      height: `${height}px`
    }
    watch: {
      // 监听数据的变化重新重新注册块进行渲染
      collection() {
        this._sectionManager = new SectionManager(this.sectionSize)
        this.registerCellsToSectionManager();
      }
    }
  }
</script>
SectionManager.js
// 获取需要渲染那些块的索引
// 一个块中可能会包含其他块的部分范围
getCellIndex ({height, width, x, y}) {
const indices = {};

this.getSections({height, width, x, y}).forEach((section) => {
  // 获取所有块的索引
  section.getCellIndex().forEach((index) => {
    indices[index] = index
  });
})

// 因为indices是一个Object所以我们要把它转换成Number来得到索引
return Object.keys(indices).map((index) => {
  return indices[index];
    });
}
渲染完后我们已经得到了当前视图中应该显示那些块了,然后最后一步就是需要定义一个滚动方法去再次渲染当前滚动区域应该显示那些块
<template>
  <div class="vue-wrapper" :style="wrapperStyle" @scroll.passive="onScroll" ref="VueWrapper">
    <div class="vue-wrapper-container" :style="scrollHeight">
      <div class="cell-container" v-for="(item, index) in displayItems" :style="getComputedStyle(item, index)">

      </div>
    </div>
  </div>
</template>
<script>
    onScroll(e) {
      this.flushDisplayItems();
    }
</script>
到这里我们已经完成了这个组件的制作了。 我们不禁可以感叹“块渲染”的思想是如此的精妙啊~~~~~~~~~,这个也是 react-virtualize的核心思想。
最后献上源码分析代码。
如有不正确,欢迎任何形式的PR、Issue ~
